Monday, 24 August 2015

A homage to Lavender

Well here I am 10 days into the chemo regime and already it has been a rollercoaster of good days and bad days so I'm endeavouring to look for some loveliness each day. Where better to feel the hum of nature and find loveliness than on a lavender hedge?

Then all that lavender offers pretty and practical opportunities for sewing! Once dried it can be put into every conceivable kind of lavender bag from traditional to the eclectic.
Lets start with the traditional, what better way to upcycle some of those vintage linens. Who wouldn't want to slip these into a sock drawer?
 
And on the subject of socks , here are some less traditional lavender bags that I made to slip into those teenagers' trainers! Sorry not the best photo but am going to do some better ones and pop them in my folksy shop.https://folksy.com/shops/SoSewMegan
I had great fun making these caravan lavender bags, ideal for caravans! No unpleasant surprises when you get the bedding out that has been stored since your last trip.
Lavender isn't just confined to sweet smells and freshness, it has been used for centuries to aid sleep. I put this sleep pad in my shop and it sold that same day and I received one of the nicest reviews ever.
 
"Comment Arrived beautifully wrapped and presented. The smell was heavenly as I unwrapped it. Thrilled to bits with my purchase. Fantastic service and a beautiful product. Thank you"
 
For me the only difficulty is harvesting the lavender because I never want to cut it at the right time, I want the bees(and me) to enjoy it as long as possible! So enjoy heavenly smells and a play on the sewing machine, can't think of a better way to spend the day.


Monday, 3 August 2015

Button Bib Necklace Tutorial


Hi,
Well here it is, as promised a tutorial for my ever popular button bib necklace. The perfect way to show off your button collection. Yes, I know its a little later than promised but I am continuing to struggle with the lymphoma. Today I feel well but am covered in spots so its a good job you're reading not visiting!

Anyway, it's a fantastic statement necklace and easy to adapt with different colour combinations and button selections. Once you've made one you'll probably get the bug and end up making loads. Feel free to play and experiment with the design and please share any photos of your creations.
 
YOU WILL NEED
  • Small piece of pelmet Vilene (20cms by 15cms minimum)
  • Machine embroidery threads
  • Ready made silk necklace cord ( or make your own)
  • Soft wool felt or fleece, the same size as your pelmet Vilene
  • String
  • Template
  • Strong fabric glue
LETS GET STARTED
 
Using the template cut out a bib from the pelmet Vilene and the felt. 


Put the wool bib to one side for the moment. Choose your machine threads; I like to use 2 contrasting threads as it gives a more interesting textured effect. Variegated threads work particularly well. Today I've chosen navy and bronze.
 
Lower the feed dogs on your machine and using a freemaching foot create your background on the pelmet Vilene. Hopefully you can see my 2 contrasting colours and my doodle pattern.
 
 
Completely fill your bib.


 Now for the best bit, choose your buttons.
 
 
Play around, placing them on the bib until you are happy with the arrangement. I tend to focus on a statement button for the centre  and work from there. Also I like to slightly mix up the colour palette to stop it appearing flat.


Sew on your buttons, I use the same colour thread throughout as it ties the design together. For the eagle eyed amongst you, yes I didn't stick with the original arrangement!
 
TIP To ensure the buttons are totally secure, add a daub of nail varnish on the thread ends on the back.
 
It's time to make one of those lovely machine wrapped cords to edge your bib. Take a piece of string and make sure you have enough to go around the whole bib section plus at least 10cms extra.


Either hand sew or machine sew zigzag the wrapped cord around the bib. If you have sewn you buttons very close to the edge it is probably easier to hand sew. If machining, make sure your foot rests on the buttons and watch that needle. I've broken both the needle and the button Grrr... so off outside to hand sew in the sun. Start at the top inside edge.
 
Once you have got all the way round make sure you tuck the ends neatly to the back of the bib and secure with a daub of glue. Then cut off the spare ends.


 Now it's time to hide that messy back and make sure that your necklace is comfortable to wear with only soft wool or fleece next to your skin. Using a strong reliable fabric glue, stick the felt backing onto the back of your bib necklace.
Last step! Machine using a zigzag stitch or hand sew the bib to your silk cord. 
Wow, wear with pride.
 
I think my colour combination would look great with blue jeans and a white shirt. Classic. I would take a photo but not whilst I'm covered in spots. Perhaps I can persuade my daughter to model it for me later!
 
If you don't have the time for this, both the green and the denim blue necklaces are in my folksy shop.https://folksy.com/items/6689903-Statement-Button-Necklace
 
Template


Saturday, 11 July 2015

Just a wander

An entirely different post today, a simple wander through my courtyard garden. Since my diagnosis ( the steroids still seem to be working well and I'm feeling pretty good at the moment) I look for some loveliness in each day and there was plenty in the garden this morning.

Walk through the gate and be hit by the bright orange of the day lilies.
 
 
Look across and you can see the roof of the swing swathed in clematis, there is also a white one mixed in with this that flowers later. The blue of the sky matches the blue of the fence today!


On the other side of the swing is a beautiful yellow bell clematis which develops the most amazing seed heads.
 
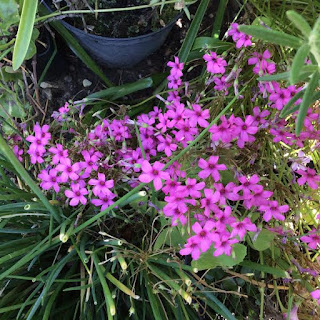
Down at your feet is a little pink phlox, possibly but unsure as it just appeared but now comes reliably each year.
 
 
Then next to it this delicate white flower.


Well that's your sneaky peep. You can see where I get a lot of my inspiration from for my bowls.


Monday, 6 July 2015

Welcome

A warm welcome to you loyal followers especially as I didn't manage a post last month despite promises. Am currently on high dose steroids as part of my treatment for Lymphoma and today is a good day so I wanted to to do a quick share with you all.


I popped this welcome wreath in my shop today but for those of you who would like to make one of your own here are some quick tips ( sorry not full instructions with photos this time).

*Cut 2 circles out of sturdy cardboard. Mine measures 18cms in diameter but you can make it any size you like.
*Cut out an inner circle from each circle. Mine measures 9cms in diameter which makes the wreath about 5cms wide.
*Choose some beautiful yarn, put the free end between the 2 cardboard circles so it is hidden and secure and just wrap.
*When happy with your wrapping , secure the end by tucking in under the layers with a darning needle.
*Cut out your leaves and welcome banner from old pages of a book and free machine onto felt.
*Make a flower of your own. I made mine out of layers of sheer fabrics as I wanted it to shimmer but any kind would look good.
* Glue on your flowers and leaves but use a high quality textile glue. I only ever use Guttermanns creative, just because it is totally reliable but I'm not into advertising.
*Plait a ribbon or yarn loop and either glue or tie in securely around your wreath.
*Te Da, hang it up somewhere to make someone happy, give to a friend or send as an alternative to a welcome home card.


Thursday, 7 May 2015

At last!

Sorry to keep you all waiting for my next blog post but unfortunately just after completing the tutorial for the embroidered cuff I discovered a lump in my neck. Several tests on, I have been diagnosed with lymphoma. My prognosis is good and I plan to keep to keep to a monthly post, however short.

Currently I am making a weekend bag for my daughter. Here it is so far;

Still in construction
 
But what I really want to share with you is the button feet.
 
How about this for an alternative to all those metal studs? I simply sewed on the large button then placed the smaller one on top but upside down so that the rounded side was on top. Then sewed again through both sets of holes. I also added a blob of glue over the stitching on the inside for extra security.


A great solution even if I say it myself. Lets hope the bag turns out well, especially as I am making it up as I go along! And yes, the fabric is beautiful but it does require careful matching at the seams, which is why the stitching is on the outside so I could see what I was doing!


I'll post a picture of the finished bag, just off to get some plastic tubing so I can make some lovely piped handles for it. Now can I include buttons on those.............


Wednesday, 11 March 2015

Knitted and Embroidered Cuff

This cuff is easy to make and uses up those odds and ends of wool that you have lying around and those beautiful buttons that you needed to buy but haven't yet found a use for!
 I have one for sale right now in my folksy shop. https://folksy.com/items/6626439-Knitted-and-Embroidered-Cuff or you can make your own.
 

Materials Needed

Small amount of a favourite colour wool
knitting needles
Stiff material for a base. Pelmet Vilene would be ideal. (However I am using some left over blind material as I hate to waste anything. It doesn't matter as it won't show).
Buttons
Green embroidery thread
Sewing machine as  ALWAYS!
Soft wool felt in a complimentary colour
 
Step by Step
1. Measure your wrist to ensure your cuff will fit. You want the width of your wrist plus 5cms. My cuff measures 22cms by 5cms.
 
2. Cut out your stiff material to that size.
 
3. Cast on 12 stitches ( adjust according to the thickness of your wool). Knit rows of plain knitting whilst doing something enjoyable, listening to the radio, watching The Great British Sewing Bee on catch up!
Knit until your knitting will stretch to fit your cuff material.
 
4. Pin your stretched knitting to the stiff material.
Thread you machine and sew between the rows of knitting.

 This gives the knitting a more flatten appearance and makes the ridges more pronounced
 
 5.Time to play. Arrange your buttons
 Sew securely in place. ( On the original I used orange thread to add a "pop" to the blue for one  or two buttons and silver for the others but this photo is of a new cuff but it emphasises the choice is yours).
 
6.Make a button hole at one end of the cuff and sew on your fastening button on the other end of your cuff.


7. Thread a needle with green embroidery thread and chain stitch your stems. There are plenty of tutorials out there if you are unsure how to do this stitch.
 
 
8. Cut your soft wool felt to the same size as your cuff and sew onto the back of your cuff all around the edge using a slip stitch.
 
9.Cut your felt through the button hole, as it is felt it won't fray. 
 

10.Voila, your own unique cuff to wear or if you can bear to, gift. Why not make them in a variety of colours to wear with different outfits.
 
 
Hope you enjoyed this tutorial, sorry it was so long coming but I have got a few health issues at the moment. Also I know it is not the earring case as first promised but this one was easier to write and as it is my first, I thought it was best to keep it simple. All being well, the next post should be in a couple of weeks. Until then, keep sewing!
 

Sunday, 22 February 2015

Wrapped Cords on an Awesome Scale

Wow, wow, wow
I've just discovered Shelia Hick's work and I thought I liked wrapped cords. Her work is inspirational on a truly grand scale.http://www.southbankcentre.co.uk/whatson/sheila-hicks-in-conversation-90219

 
Wish I'd discovered her work earlier as I would have definitely made time to go to this talk. However I'm sure I can get to London to see the exhibition as it runs until April 19th. Oh you Lucky Londoners.